A 144Hz refresh rate can make a massive difference in gaming, offering smoother motion, reduced input lag, and an overall better experience. However, many gaming laptops don’t automatically run at 144Hz, and poor optimization can cause frame drops, stuttering, or lower-than-expected FPS.
If you’re not getting the full benefit of 144Hz, there are several ways to enable the refresh rate, boost FPS, and optimize system performance. This guide explains everything you need to do to make sure your gaming laptop runs at 144Hz smoothly
How to Check If Your Gaming Laptop Is Running at 144Hz?

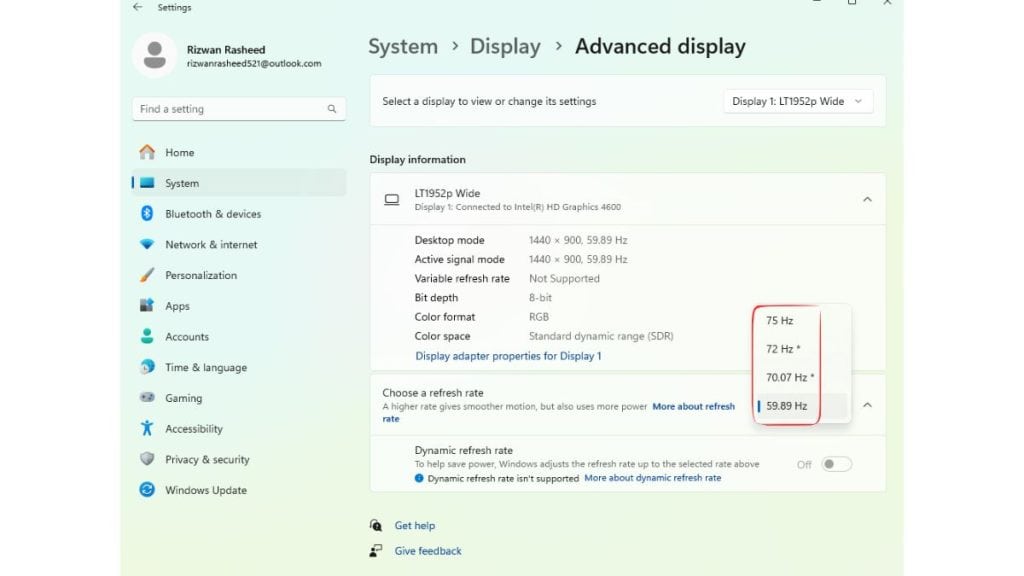
Some gaming laptops default to 60Hz instead of 144Hz, meaning you won’t get the full benefits unless you manually change the settings. To check if your laptop is using the correct refresh rate:
- Right-click on the desktop and select Display Settings.
- Scroll down and click Advanced Display Settings.
- Under Refresh Rate, see if 144Hz is selected.
- If it’s set to 60Hz, change it to 144Hz and apply the settings.
If 144Hz is unavailable, your drivers, cables, or system settings may need adjustments.
How to Enable 144Hz Refresh Rate on a Gaming Laptop?

Even if your laptop has a 144Hz display, it might not be enabled by default. You may need to adjust settings in Windows, NVIDIA Control Panel, or AMD Radeon Software.
If you’re using an NVIDIA GPU:
- Open NVIDIA Control Panel.
- Navigate to Display > Change Resolution.
- Select your laptop display and choose 144Hz under refresh rate.
For AMD Radeon GPUs:
- Open AMD Radeon Software and go to Display Settings.
- Check the Refresh Rate option and set it to 144Hz if needed.
If the refresh rate is still stuck at 60Hz, check if your laptop’s display cable supports 144Hz. Some models require an HDMI 2.0 or DisplayPort connection to enable higher refresh rates.
How to Optimize GPU Settings for 144Hz Gaming?
A gaming laptop’s GPU settings play a major role in delivering smooth 144Hz performance. Incorrect settings can cause low FPS, stuttering, or lag.
To ensure your GPU is running optimally:
- Update your GPU drivers regularly using NVIDIA GeForce Experience or AMD Radeon Software.
- Enable G-Sync (for NVIDIA users) or FreeSync (for AMD users) to eliminate screen tearing.
- Set Power Management Mode to Maximum Performance to prevent FPS throttling.
Additionally, some games limit frame rates automatically, so always check in-game refresh rate settings and set them to 144Hz or higher.
How to Increase FPS for a 144Hz Display?
Even if your laptop runs at 144Hz, low FPS can prevent smooth gameplay. A 144Hz screen is useless if your FPS is stuck at 60-70.
To boost FPS:
- Disable background apps like Chrome, Discord overlays, and Windows widgets.
- Lower in-game graphics settings, such as shadow quality, anti-aliasing, and ambient occlusion.
- Enable Windows Game Mode and Hardware-Accelerated GPU Scheduling for better performance.
- Ensure your laptop’s cooling system is functioning properly to prevent thermal throttling.
If your laptop’s FPS constantly drops, consider undervolting or repasting thermal paste to improve temperature control and system stability.
How to Prevent FPS Drops & Screen Tearing?
Even with a high refresh rate, FPS drops or screen tearing can ruin your gaming experience. These issues occur when the GPU and display refresh rate are out of sync.
One way to prevent this is by enabling V-Sync, G-Sync, or FreeSync. While V-Sync reduces screen tearing, it can introduce input lag, so many gamers prefer G-Sync (for NVIDIA) or FreeSync (for AMD) for smoother performance.
Another common issue is thermal throttling—when your laptop overheats, the GPU reduces performance to prevent damage. This can cause sudden FPS drops. Make sure to clean dust from vents, use a cooling pad, and monitor GPU temperatures with software like MSI Afterburner.
If screen tearing persists, check if your game settings are properly configured. Some games have a frame cap that prevents FPS from exceeding 60, even on a 144Hz display.
Does HDMI or DisplayPort Affect 144Hz Performance?
Many gaming laptops support 144Hz via HDMI or DisplayPort, but not all cables are equal. If your laptop is not displaying 144Hz on an external monitor, your cable may be the issue.
|
Connection Type |
Maximum Refresh Rate Supported |
| HDMI 1.4 | Up to 120Hz at 1080p |
| HDMI 2.0 | Up to 144Hz at 1080p, 120Hz at 1440p |
| DisplayPort 1.2 | Up to 165Hz at 1440p, 240Hz at 1080p |
For best performance, use HDMI 2.0 or DisplayPort 1.2 (or higher). Older HDMI cables may limit refresh rates to 60Hz, even if your laptop and monitor support 144Hz.
Common Issues & Fixes for 144Hz Gaming Laptops
Some users struggle to maintain 144Hz performance due to various system limitations. Here are some common problems and how to fix them:
- Laptop stuck at 60Hz: Ensure 144Hz is enabled in Windows display settings and GPU control panel.
- 144Hz not showing in settings: Use a high-speed HDMI/DisplayPort cable and update display drivers.
- FPS drops below 144Hz: Lower graphics settings, close background apps, and adjust power settings.
- Motion blur or ghosting: Check if your monitor has an Overdrive option in settings and enable it.
- 144Hz not working on an external monitor: Confirm you’re using the correct input port (some laptops only support high refresh rates on specific ports).
Conclusion: How to Keep Your Gaming Laptop Running at 144Hz?
To fully experience the benefits of a 144Hz refresh rate, you need to enable the setting, optimize your GPU, and boost FPS for smoother gameplay. Ensuring proper system cooling, disabling unnecessary background apps, and using the right cables will help maintain consistent high refresh rate performance.
Regular driver updates, system maintenance, and game optimizations are key to keeping your gaming laptop running at peak performance.
If you’re still facing issues with 144Hz optimization, let us know in the comments, and we’ll help you troubleshoot further!